How to record a series
- Record a Series Using the Guide
- Press GUIDE.
- Use the arrow buttons or CH/PG to highlight the program that you want to record.
- Press RECORD twice. A red dot appears on the first press, and three overlapping dots appear on the second press. This indicates that a series is recorded. Your PVR service will now record that program at the same time on the same day each week.
- Record a Series from Live TV
- Press GUIDE on your remote control.
- Use the arrow buttons or CH/PG to highlight the program that you want to record.
- Press INFO. The Program Info Screen appears.
- On the Program Info Screen, highlight Record Series, and press OK. The Record Series Screen appears.
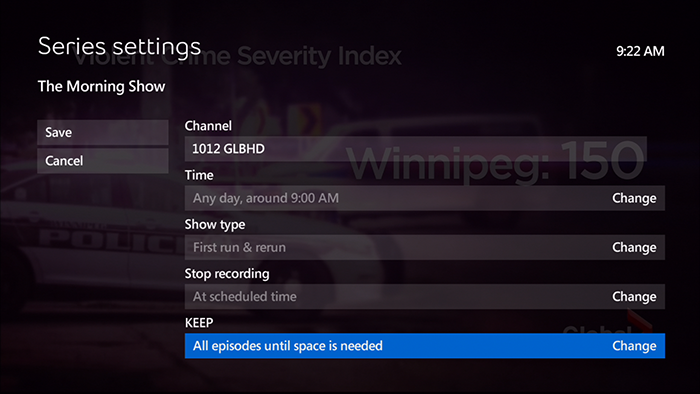
- To change the time of recording, highlight the text under Time, and press OK. Highlight one of these options, and press OK:
- Any day, around XX:XX AM/PM – Records programs any day of the week, as long as they occur at or near the same time as the selected episode.
- Any day, anytime – Records programs any day of the week at any time.
- Any day, anytime, once per day – Records programs any day and time, but records only one episode per day.
You can also select Don't Change to keep current settings.
- To change the type of recording, highlight the text under Show Type, and press OK. Highlight one of these options, and press OK:
- First run & rerun – Records first-run and all subsequent reruns of this program.
- First run only – Records first-run episodes, but will not record reruns.
- To add extra time to ensure that you record each entire episode, highlight the text under Stop Recording, and press OK. Highlight one of these options and press OK:
- At scheduled time
- 5 minutes after
- 15 minutes after
- 30 minutes after
- 1 hour after
- 2 hours after
- 3 hours after
Or, highlight Don't Change and press OK to keep your current setting.
- To activate your settings, highlight Record, and press OK.
- How to Limit the Number of Episodes Recorded
Set a maximum number of episodes within a series that your PVR will record and store. Series recording now has an additional option that allows you to set a maximum number of episodes you wish to record on your PVR.
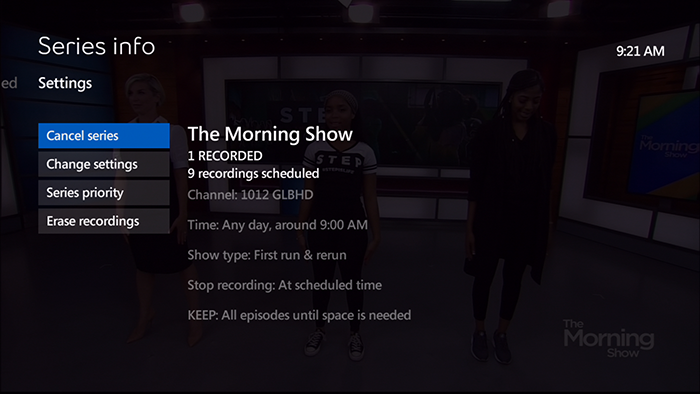
You can now set the number of episodes that you wish to record by pressing the Change Settings button.
The keep additional options are as follows:
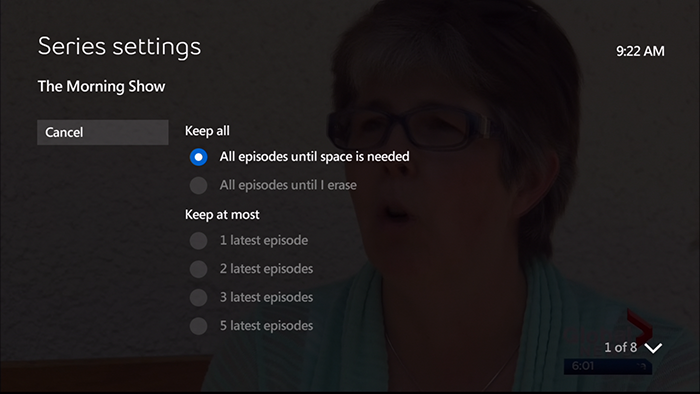
You can now specify how many episodes of a recorded series to keep on the PVR before deleting:
- 1 latest episode
- 2 latest episodes
- 3 latest episodes
- 5 latest episodes
- 7 latest episodes
- 14 latest episodes
Note:
You can still specify a specific episode to not be erased by pressing the do not erase until I erase option. Once your PVR reaches the episode limit you choose for that series, new series episodes will continue to record by replacing the oldest episode recording that has not been set to "keep until I delete". If all episodes are marked "keep until I delete" no new episode will be recorded beyond the series limit you have set.
- How to Set a Recording Priority in Case of Conflicts
You can now set a series priority which will ensure that, in the case of a conflict, your favorite series gets recorded first.
- To set your series priority, press the RECORDED TV button on your remote control.
-
Use the right arrow button to navigate to the <<Series>> option.
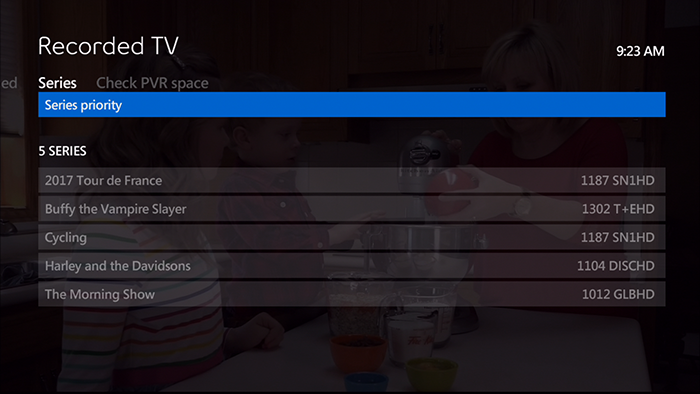
- Use the down arrow button to navigate to the Series priority option on the panel.
-
Press the OK button on the remote control.
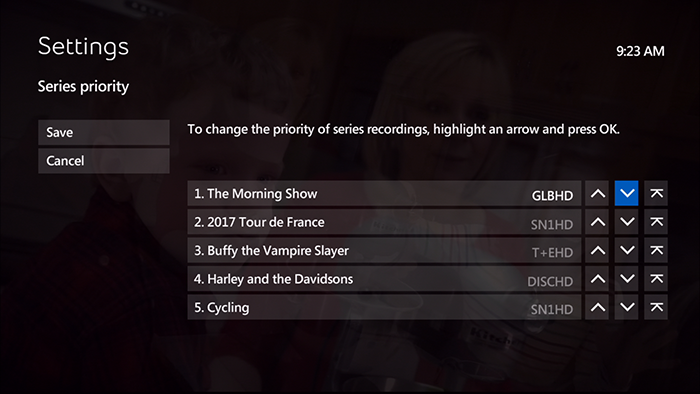
- Use the arrow buttons on the remote control to scroll to one of the series not at the top of the list.
- Navigate to the up arrow with a line above it
 and press OK on the remote control. The series has now moved to the top of the series list - highest priority.
 - Use the arrow buttons on the remote control to scroll to another series in the list.
- Navigate to the up arrow and press OK on the remote control. The series has now moved up one space/spot on the priority list.
- Use the arrow buttons on the remote control to scroll to another series in the list.
- Navigate to the down arrow and press the OK button on the remote control. The series has now moved down one space/spot on the priority list.
- Record or Clear an Overridden - Cancelled - Series Recording
A series conflict icon (crossed-out, three overlapping red dots) in the Guide marks a series episode that was cancelled in favour of another recording. When you select a cancelled series recording in the Guide, a Program Info Screen screen appears.
You can handle an overridden series episode in one of these ways:
- Leave it as is.
- If you cancel the other program(not the series recording), the cancelled series episode is rescheduled for recording. The conflict icon reverts to overlapping red dots.
- Clear the conflict icon to cancel the entire series recording.
- Press GUIDE on your remote control.
- Use the arrow buttons or CH/PG to highlight the overridden episode, and press OK. A Program Info Screen appears.
- To record a cancelled series episode instead of the other program(not the scheduled series), highlight Resolve Conflict, and press OK. A Conflict screen appears. Highlight the previously overridden series, and press OK. The cancelled episode will record and cancel the recording for the other program.
- Or, to cancel a series recording, highlight Cancel Episode, and press OK. In the confirmation screen, highlight Cancel Episode, and press OK. The entire series recording is cancelled. All series conflict icons for it are cleared. This does not erase episodes that were recorded already.
- How many programs can I record at once?
You can watch or record up to three HD or SD shows at the same time.