Using EasyStoreMaker Pro
EasyStoreMaker Pro gives you the opportunity to set up a full-featured store on your website. Orders placed there can be viewed securely online, giving you all the information you need to keep things organized (e.g. name, shipping address, products ordered, total price and payment information). Enter your products, organize them in categories, set the prices and the tax calculator; you can even select the currency your store will use. All this, and more.
- Installing EasyStoreMaker Pro on your domain
To install EasyStoreMaker Pro (ESM Pro) on your domain:
- Log in to WebsiteOS if you are not already logged in.
- Click on the “E-commerce” link, found towards the left of the WebsiteOS screen.
- Click on “EasyStoreMaker PRO”.
- An installation window will appear, asking if you want to install and configure ESM Pro using the Install Wizard, or by manually configuring your EasyStore.
Manual configuration of ESM Pro is only recommended for users who are already familiar with the configuration of ESM Pro, and/or have read through the section titled Manually configuring EasyStoreMaker Pro and all of its related topics.
If you run the installation wizard (recommended), you will be guided through the essential steps of setting up your storefront. At each step, detailed information is provided explaining what type of information is expected every step of the way. You will also be asked questions concerning optional features of your store. If you are uncertain if you want to use a particular feature, you can skip configuring that feature and configure it later; see Manually configuring EasyStoreMaker Pro and its related topics.
When you have finished configuring your store with the installation wizard, you will be asked if you want to create products for your store to sell. If you select “Yes”, then you will be given the option of running the Add Products Wizard. If you choose not to add products at this time, you will always have the option of using the Add Products Wizard at a later date.
- Uninstalling EasyStoreMaker Pro
To uninstall the EasyStoreMaker Pro from your domain:
- Open the EasyStoreMaker application from the “E-commerce” menu.
- Select the radio button next to “Uninstall EasyStoreMaker Pro. (Everything is permanently deleted)” and click “Next”.
- EasyStoreMaker Pro has now been uninstalled.
Note:
Uninstalling EasyStore Pro permanently deletes all related records from your domain. If you reinstall EasyStore Pro at a later date, all the information you entered during your previous installation will have to be re-entered.
- Using the add products wizard
The Add Products Wizard can be run at any time. If you are installing EasyStoreMaker Pro (ESM Pro) for the first time, you will be given the option of running the Add Products Wizard after configuring your store with the install wizard. If you are not installing EasyStoreMaker Pro (ESM Pro) for the first time, or you chose to manually install ESM Pro, you can access the Add Products Wizard using the following method:
- Log in to WebsiteOS if you are not already logged in.
- Click on the E-commerce link, found towards the left of the WebsiteOS screen.
- Click on EasyStoreMaker PRO.
- Click on the Add Products Wizard link which appears in the middle of the screen.
When the Add Products Wizard starts, just follow the step-by-step instructions which appear on the screen. If you wish to manually edit, add or delete products, see the section titled How to enter product information.
- Manually configuring EasyStoreMaker Pro
To access EasyStoreMaker Pro, select “E-commerce” from the main menu, and select “EasyStoreMaker Pro”.
To accommodate the large amount of new features available in EasyStoreMaker Pro, the store's preference interface is split up into 3 sections: Tab, User Data and Category. A labelled illustration, with explanations, follows:
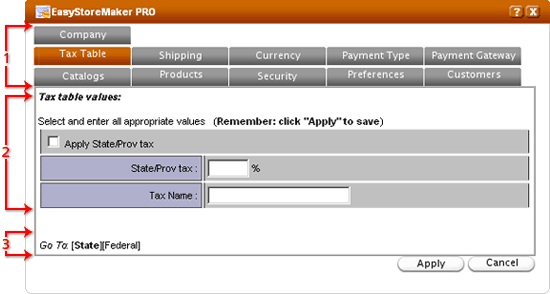
- (Tab): The topmost section of the preferences window has labelled tabs. Clicking on a tab opens a window, with information related to the tab name. In the example above, the "Tax Table" tab is currently selected. If you have made changes to a tab, and want to save the data you have entered, you must click "Apply" before moving on to another tab.
- (User Data): The middle section of the page is where the user's preferences are displayed for a particular subject.
- (Category): Because of the large amount of configurable data under certain tabs, some of them have been subdivided into categories. In the example above, the "State" category is displayed. Each category contains a related set of data which is relevant to the selected tab. When you move between different categories, you are just viewing different sets of data for the same tab. If you have made changes to a category, and want to save the data you have entered, you must click "Apply" before moving on to the next category.
- How to enter your company info
The information entered into the "Company" tab will appear on your EasyStore Pro web pages. If you do not wish to have this information displayed, make sure the "Hide Footer" box is checked. The only mandatory fields are the State/Province and Country fields. These are required to help calculate the tax on your customer's orders.
If you enter in your company's email address, and hide your company footer, the email address will still be displayed.
In the "Header" category, you may enter your store name and select the filename or URL of your company logo. For information on uploading images, see the section titled Uploading Images.
In the "Messages" category, you may enter the following message types:
- Introduction Message: A welcome message which appears on your storefront.
- Thank You Message: A message which displays at the completion of a customer's order. You may also choose to send this message to customers by email.
- Maintenance Message: This message will appear, if for any reason your store is temporarily unavailable.
- Disclaimer Notice: Checking "apply disclaimer" and filling out this text box will create a link in the footer of your store's page, which will link to a pop-up window. This window will display your disclaimer message.
- Privacy Statement: Similar to the "Disclaimer Notice", except this is used to include a privacy statement, accessible through a link on the footer of your store.
- How to enter the tax information
The "Tax Table" tab is where you enter the tax values to be applied to your customer’s orders. You can enter the amount of tax, as well as the name of the tax being applied. There are two subcategories of tax: "State" and "Federal". In the "Federal" section, you get to chose if your state tax is added to federal taxes before being applied, or if it is applied after federal taxes have been applied. You can also choose not to charge any taxes if you wish.
This is where the "State/Prov." and "Country" information come into play. EasyStore Pro calculates the amount of tax that is charged per order based on the buyer’s place of residence.
- How to enter shipping prices
The "Shipping" tab allows you to enter shipping fees, which will be applied to all orders. There are three main classifications of shipping: Regional, National, and International. Explanations are as follows:
- Regional: Shipments to locations in the same region as the store, i.e. the same state or province.
- National: Shipments to locations in the same country as the store, but are outside the store's state or province.
- International: Shipments to locations in a different country.
The "Charge Rate" category allows you to specify the charge rate for each of the shipping methods you have created. Using this interface, each shipping method must be associated with one of the three main classifications shown above. Shipping and handling fees can be based on quantity or weight. If you choose to base it on weight, then you must enter a weight for all of your store's items. It is possible to have more than one shipping option available to each classification (e.g. rush delivery and regular mail). By default, there should be three shipping methods already set up: Regional, National and International.
To use these default shipping methods, complete the steps outlined below:
- Click on the "Additional Charges" category. If this section has no values entered, skip ahead to step 3; otherwise, proceed to step 2.
- If you want to use the charge rates listed in this interface, write down the rates for each shipping type, then remove this information from the interface and click Apply.
- In the "Charge Rate" category, select the first method listed in the drop-down menu.
- Make sure that "Apply this method" is checked. If it is not, place a checkmark beside it.
- Indicate which classification of shipping this method should be applied to. In this instance:
- The "Regional" method should be applied to "Regional Orders".
- The "National" method should be applied to "National Orders".
- The "International" method should be applied to "International Orders".
- Using the drop-down menu located near the top of the interface, indicate whether this should be a flat-rate or a range-rate charge. Fill out the charge rate(s) as appropriate.
- Click Apply to save your settings.
- Select the next method from the drop-down list. Repeat steps 4-8 until all shipping methods have been configured.
- Click on the "Instructions" category.
- Select the first method from the drop-down list.
- Type in any information or instructions you want the end-user to see concerning this shipping method (e.g. shipping cost, average shipping time, etc.) Click Apply when you are done.
- Select the next shipping method from the drop-down list. Repeat steps 11-12 until all shipping methods have been configured.
- Click on the "methods" category.
- Select the first method in the list provided.
- If you wish to set a maximum weight or quantity of items for this shipping method, do so using the text box and radio buttons provided; otherwise leave the text box empty.
- If you made any changes to this method, click Apply if you wish to save them.
- Select the next shipping method from the drop-down list. Repeat steps 15-17 until all shipping methods have been configured.
- You are now ready to use the default shipping methods.
To create a custom shipping method, follow the steps outlined below:
- Under the "Shipping" tab, go to the "Methods" category.
- Enter a new method name in the space provided, then click [+] to add this method to the list.
- Select the new method from the list.
- If you wish to set a maximum weight or quantity of items for this shipping method, do so using the text box and radio buttons provided; otherwise leave the text box empty.
- If you made any changes to this method, click Apply if you wish to save them.
- Click on the "Instructions" category.
- Select the new method from the drop-down list.
- Type in any information or instructions you want the end-user to see concerning this shipping method (e.g. shipping cost, average shipping time, etc.) Click Apply when you are done.
- In the "Charge Rate" category, select the new method listed in the drop-down menu.
- Make sure that "Apply this method" is checked. If it is not, place a checkmark beside it.
- Indicate which classification of shipping this method should be applied to. Using the drop-down menu located near the top of the interface, indicate whether this should be a flat-rate or a range-rate charge. Fill out the charge rate(s) as appropriate.
- Click Apply to save your settings.
- Your new shipping method is now ready for use.
- Authorize.net Configuration requirements
If you have obtained an Authorize.net merchant account, you need to make some settings changes to your Authorize.net account to ensure it will work with EasyStoreMaker PRO.
- Login to your Authorize.net account, at https://secure.authorize.net/
- Click the "Settings" link, located midway down the left-hand side of the page.
- Click on the "Virtual Terminal" link on the right-hand side of the page. Do not click on the link with the same name in the top-left corner of the page.
- Check all of your field names. Look for any field names which have a checkmark beside them in the "required" category. If you find any, remove the checkmark. When you are finished, click "Submit".
- Click on the "Settings Main Menu" link. On the page that loads, scroll down and click on the "Address Verification System (AVS)" link, located under the "Security" section.
- Go back to the Settings menu. Scroll down and look for the SECURITY section, then Address Verification System (AVS)
- Make sure all checkboxes are empty. Click "Submit" when you are done. Go back to the "Settings" menu.
- Click on "Payment Forms", then "Form Fields".
- Make sure all of the "Required" fields are unchecked. If you had to uncheck any boxes, save your settings.
- Go back to the "Settings" menu, click on "Response Receipts".
- Make sure the list is empty. Delete any list entries of they exist. Save any changes you have made.
Your Authorize.net merchant account has now been properly configured to work with EasyStoreMaker PRO.
Note:
Only standard Authorize.net accounts will work with EasyStoreMaker Pro; Authorize.net Secure accounts will not work.
- Selecting the currency
Under the "Currency" tab, EasyStoreMaker Pro allows you to choose the currency you want to use. Select the one you want from the drop-down menu. If you select any dollar currency, you have the option of having the “$” appear next to the amount. By default this option is selected, so if you have chosen a non-dollar currency, be sure to uncheck this box.
Also in this window, there is a checkbox for using a gateway to perform online credit card authentication and billing. If you wish to perform online billing through a payment gateway, you must first obtain an account with that gateway.
The "countries" category allows you to limit which countries you do business with. This is useful if, for example, you are based in North America and wish to do business only with the United States and Canada. You may configure this in one of three ways:
- Do business with all countries: Selecting this option allows all countries to place orders.
- Do business with only the following countries: Selecting this option allows you select which countries specifically you wish to do business with. After choosing this option, select a country form the top list, and click [+] to add the country to the list. To remove a country from the list, select it and click [-].
- Do business with all but the following countries: Selecting this option allows you select which countries specifically you wish exclude doing business with. After choosing this option, select a country form the top list, and click [+] to add the country to the list. To remove a country from the list, select it and click [-].
- Choosing a gateway
The "Payment Gateway" tab allows you to enable automated credit card billing, and to select the payment gateway you want to use.
Please note that you must have already set up an account with the payment gateway you select before you can use this option.
The "Payment Gateway" category allows you to select what gateway you wish to use to process credit card orders. You only need to supply settings in this category if you are accepting credit card orders and you wish to automatically charge the credit cards. For a complete, up-to-date list of the payment gateways EasyStoreMaker PRO currently supports, check under the "Payment Gateway" tab. Under this tab, you must enter your merchant account information in the "Details" category. The type of information you must enter varies with the gateway you have chosen; however, usually at the very least you will be expected to enter your merchant account username and password. You only need to supply settings in this category if you have elected to configure a merchant gateway. Some payment gateways require additional configuration outside of the EasyStoreMaker PRO interface (e.g. in the account profile you have with your merchant gateway provider). If additional configuration is required, you will be advised of this within the ESM Pro gateway configuration interface.
For more information on the payment gateways available for use in EasyStoreMaker Pro, click on the banners displayed under the "Payment Gateway" tab for each gateway shown.
- Entering information on the security tab
The following fields are displayed under the security tab:
Order Notification: check this box if you wish to receive email indicating that orders have been placed. Please note that the order notifications do not contain actual order information, just a notice that an order has been placed.
Notification Email Address: this is a field for the email address which will receive order notifications. This email address will also be used to send you your password if you have forgotten it. It is important that you enter in a valid email address in this field.
Order Processing Username: this is the username you would use to log in and pick up your orders online. It is the same as the domain name of your website.
Order Processing Password/Confirm: when changing the password or entering in a password for the first time, both of these fields must be filled. If what was entered in each field is not identical, the new password will be rejected. For increased security, the password is never shown as clear text. The "secure socket layer" category shows you what url will be used to securely process orders for your store.
- Uploading images
If you are running the Add Product or Install Wizard and have an image on your computer which you wish to use for your product, when you get to the section of the wizard which asks you to type in the URL or relative path for your image, simply click on the “Browse…” button at the bottom of your screen. A dialogue window will open, allowing you to locate and select the image you want to use. Then click the “upload” button and your image will be uploaded to your
/public/storemaker/images/directory. Please note, you will still have to manually enter the URL or relative path to your image. The “browse” and “upload” buttons are convenient methods of uploading images for your store’s use.To upload your own images, follow the Using the upload function page of the Managing your website section of the Help files.
- The target directory for your image should be set to
/public/storemaker/images - The image format can be any image that can be viewed in a web browser (gif, jpg, png, etc.)
You may upload your store logo, product and catalogue images to the location shown above.
- The target directory for your image should be set to